The Inspired Hive

Inspiration for a creative home

Search

Living room: Sneak peek!

I'm just so super excited about the living room finally starting to come together a bit, I wanted to give you a little sneak peek! I've only painted two walls so far so you'll have to check back next week for the final reveal. I can't wait!
So here's one little snippet of what I've done so far... just need Pete to help me hang this giant clock when he gets home! Or maybe I like it on the table.... hmmm....
What do you think so far?!?
post signature

When your watchdog is a cat...

Both of our cats think they're dogs. They're not your typical cats. They wait at the door for us to come home. They follow us everywhere. They beg for food. They like to play rough with us. One of our cats even likes to play fetch. Who wouldn't be a crazy cat lady if they were guaranteed to have little angels like mine?? ;)

One of my cats is our little watchdog. (His name is Kitten, lol) He likes to keep us posted when things are going on. One time in college he wouldn't stop howling in the middle of the night and I couldn't figure out what his problem was. Well, in the morning, turns out my boyfriend's car windows had been smashed and some very nice stereo equipment had been stolen. Kitten was just trying to let me know there was a thief outside! 

Well this morning he was going crazy by the back door. He was making all sorts of noises, not angry noises, but like, "Hey, Mom, come look!" So I went over to the back door and literally laughed out loud. Kitten and a deer were in some sort of a throw down. Kitten is talking and swinging his tail back and forth (he thinks he's tough), and the deer has her (no antlers means her, right??) eyes locked on Kitten and is stamping her foot! I couldn't believe it!

I ran to get my camera and started taking pictures. I couldn't get far enough back to get Kitten in the picture, but imagine him sitting at a big sliding glass door. 


I then noticed movement out of the corner of my eye and realized this deer had a friend with her!


And thennnn... this little baby came trotting out of the trees!!!


So adorable!

I think most people hate when deer get in their yards because they eat all the plants, but I don't mind. Don't get me wrong, we've got some bushes that have been given some funky hair cuts thanks to these guys, but it just makes me so excited to see critters in my yard! Maybe I should've been a vet... I would have a zoo if I could!

Well that's all... just a little glimpse into my morning :) Have a great rest of the day!
post signature

"Will you be my bridesmaid?" Cupcakes

Every bride-to-be knows the cute new thing is to come up with a sweet and clever way to ask your girls to play a part in the big day. If you search "will you be my bridesmaid" on Pinterest, you'll get TONS of ideas! When I started thinking about who I was going to ask to be in our wedding (which is one of the hardest decisions I've ever made!), I wanted to do something out of the ordinary. So, I decided to combine some of the inspiration I had seen with my wedding colors and my love of baking (after all, I had just gotten a new Wilton decorating kit as a gift!!!).

Will you be my Bridesmaid | {Meet the B's}

Obviously this project is from a while ago since I'm now married, but I thought it was still worth sharing! I had so much fun making these! 

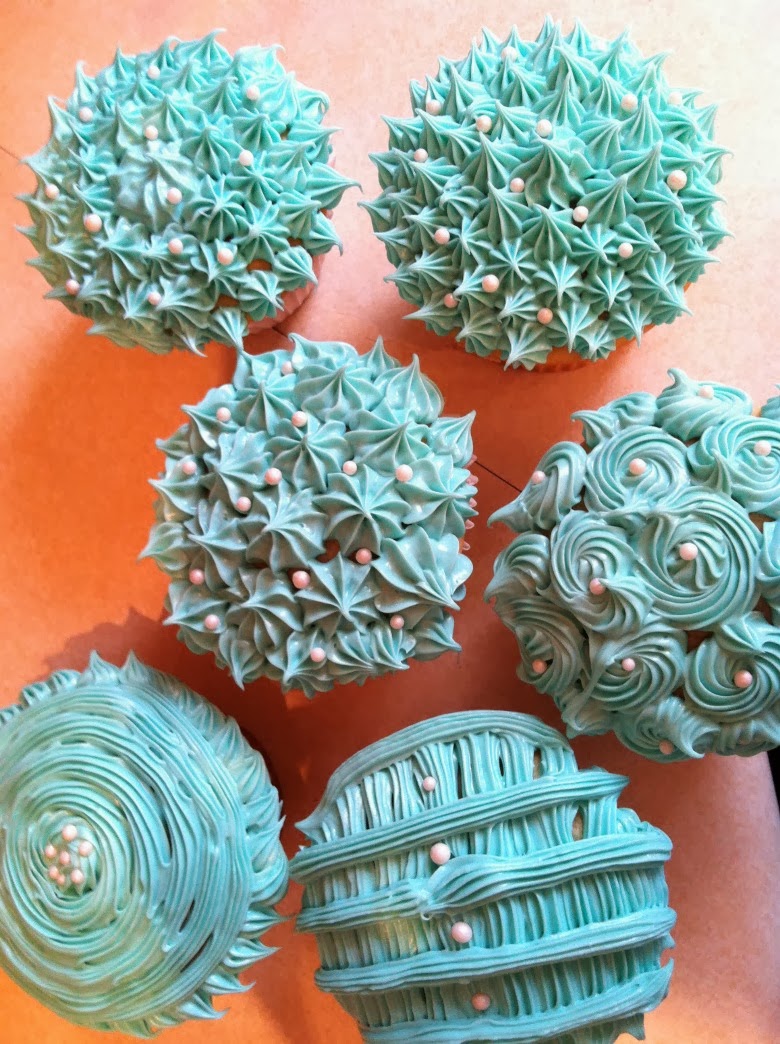
I do apologize ahead of time for crappy photos... these were all taken on my iPhone, before I had my new fancy camera! You also might notice they all look a little different.. I made three different batches because I wasn't seeing all the girls at the same time. So I got to experiment quite a bit! :)


This is my FAVORITE cake mix and icing to use. Just personal preference. If you're a fancy schmancy baker, insert favorite made from scratch recipe here :) (I do lovvvve a good home made cake too, but time did not permit in this case!)

I then purchased an oversized cupcake pan and large cupcake boxes from Michael's. These cupcakes are not your standard size.. they're GIANT cupcakes! Yum!

I used just a touch of Wilton's food coloring (a little goes a long way!) to get my favorite color, of course! :)

I made extra cupcakes with each batch so that I could play around with different patterns and shapes with the icing. I would then pick my favorites as the ones to give the girls!


For the cake boxes, I used scrapbook paper in my wedding colors, a paint pen, and some flower embellishments I found at Michael's. This is where you can get really creative. You can literally use any color scheme and any embellishments! Why not add some ribbon or lace? Make your own flowers. Add some jewels or buttons. Use some cute scrapbooking stickers. The possibilities are endless!

For the inside lid of the boxes, I made them all pretty much the same. I hand wrote "Will you be my bridesmaid?" with a silver paint pen. Except my sister's.. hers said maid of honor!


On the outside of each box, I personalized it with their name and added a flower :)


Here's the finished product...


And here's my sister and I, super excited about her awesome cupcake!!


Linking up: The SITS Girls
post signature

Home Binder

Creating a Home Binder | Meet the B's

If you are ever on Pinterest, you know that home binders are the new big thing. Almost every time I log in, there is at least one example of a home binder on my feed. 

Now that I have a house, it seems like an excellent way to keep organized. So I was on the hunt for the perfect set of printables. I would like to eventually make my own, but until I get better at designing printables and until I've evaluated my needs for my binder, I decided to use some ready-to-print templates. Check out my Pinterest board for lots of free or affordable home binder printables!

I decided to use a set I found on Etsy. Check out the shop PrettyOrganised for the one I purchased. I chose it for it two reasons. Number one, it's my colors. Duh! Which means it will flow perfectly when left in my office area. Number two, it includes 300 printables, so it will really allow me to play around with what I do and don't need in my binder. Caylee (the owner of PrettyOrganised) covers every section and category you could possibly think of for your binder. She also lists that she can make custom pages for you. Perfect!


I purchased the entire kit, but I didn't print many pages to start, just a few that I knew I could use (maybe 12 or so). I will definitely be printing more and more of them over the next few months as I start to use the binder more and more. Since I didn't print many pages yet, I also didn't print the included dividers. I figured I might as well wait until I have enough pages to actually need to separate them all. However, I think her dividers are super cute and I can't wait to use them!


For the actual binder itself, I used the Martha Stewart binder sold at Staples in blue, again to match my office area. It's more of an aqua color. 


Sometime in the future, look for a post on home binder necessities as I figure out what categories I actually need! What categories do you find are a must have in your binder?
post signature

DIY painted "Love Lives Here" sign

DIY painted "Love Lives Here" sign

I've been keeping an eye out for inspiration for art for our entryway. When I was at JoAnn's recently, they were having a huge sale on canvases, so I bought a couple, including a small 6" x 6" canvas. I thought it would be perfect for a small sign to lean on a shelf or on our entryway table. 
I think the "love lives here" quote would be a perfect welcoming statement when walking into someone's home, so that's what I chose. 
Here's how I created my sign...
First prep your area. Since my canvas is small, I just used some computer paper to cover my work surface. 


The paint I chose is actually made for ceramics, but I wanted the texture of it. It's kind of got the feel of chalk paint. The color is a greyed down aqua because I wanted a pop of color but still somewhat neutral. 


Paint the sides of your canvas first and then the front. I used two coats of paint. 


Next, use a pencil to create your design. That way you can erase if you mess up. I started to trace my letters with a white paint pen, but the pen was malfunctioning, so I ended up using white paint and a small brush. 


Lastly, I added leaves to the laurel branches. I LOVE the use of laurel branches in artwork these days. And they're perfect to set the tone for our somewhat rustic home.


Tah dah!! What do you think of my new entryway art? Do you have any DIY signs to share?


Linking up @ Tatertots & Jello, I'm Not a Trophy Wife, The SITS Girls, Tip Junkie, and Design, Dining, and Diapers!!!


post signature

How to change your last name

How to Change Your Last Name | Meet the B's

I was so excited to become Mrs. Brzuchalski. I didn't realize what a pain in the butt it was going to be!!! It's been a longgggg process, but I'm finally almost done making all the changes. At least all of the important things have been taken care of. 

There are services out there that will help you with the process, but I opted to save some $$ and do it myself. I wrote a generic letter that I could fill in the blanks for company names and other vital info. I made of copies of my marriage certificate and my driver's license and sent all my letters out. Easy as that! Well... other than having to wait in line at the social security office and the MVA... fun.

I'm not going to give you a big list of things to change. I just wanted to provide you with some of the awesome resources I found helpful!

One thing I found that is not on most name change checklists is licensures and certifications. If you work in the medical field (like me!) or have some other important certification, don't forget to change your last name on your professional license!!!

Here's some help with the whole process... Good luck!
post signature

Shabby Chic Aquarium Stand

Shabby Chic Aquarium Stand | Meet the B's

Animal lover. That's me. All kinds of animals. In my lifetime, I have had pet cats, dogs, fish, crabs, snails, lizards, turtles, and even a hedgehog. Animals just fascinate me. So you'll probably read a lot on my blog in the future about my cats, turtles, and my three different aquariums. 

Today I'm focusing on my saltwater aquarium. I started it back in 2010. I was so enchanted by snorkeling, watching reef tanks, and visiting the National Aquarium. I could literally sit for hours staring at a reef. There are so many tiny little things going on that the average eye would miss. Like tiny little hermit crabs scavenging for food, or the tentacles of a coral blowing in the current, or copepods crawling over live rock, or a fan worm slowly coming out of its tube and opening up to show its beautiful colors. There's just so much to look at!

So after I graduated from college I bought a used 40 gallon saltwater set up off of Craigslist. 

I painted the tank stand brown to match all of my bedroom furniture (unfortunately I can't find a good picture of this!) and then started the long process of setting up and cycling the tank. Fast forward a year and a half, and it was time to move. I moved to a small townhouse and it just didn't make sense to set up the 40 gallon tank there. So I moved as much as I could into a 20 gallon tank. This wasn't the ideal situation because it meant doing without some important equipment and cutting my amount of live rock significantly (if any of you know reef tanks, you see my problem). 

Miraculously my two little clownfish have survived in the 20 gallon tank for about a year and a half now. When we moved into our new house, we decided to keep them in the 20 gallon until I could repaint the tank stand to match our current decor. With unpacking and many projects going on, it's taken a little while to get to, but we've finally started! Yay!!!

So this isn't a fully completed project (and will take some time since I have to recycle all of my old rocks), but I wanted to show off my tank stand's paint job!

Hubby got a belt sander for Christmas, so he decided to try it out. It gouged it up a lot, but I kind of like the distressed look it gave it. 


Then I gave it three coats of paint..


We plan on putting in the office/craft room, which is currently full of Ikea furniture, so I wanted it to match in color. Ikea furniture is a creamy white, so I knew I couldn't just go buy any old white paint. Thankfully, after a quick search on Pinterest, I found that Young House Love did all the color matching work for me! Thanks John and Sherry!!!


And here she is in all her painted glory!


I'm contemplating whether or not I want to add some ORB knobs. And maybe distress some of the edges. What do you think? 


post signature

Secret's Out!

When people find out you have a blog | Meet the B's
Well, the secret is sort of out...

Yesterday I told one of my best friends about my blog. Yikes! Why is that so scary??

Up to this point no one in real life has really known. Well, except my husband who I made promise not to read it until I say it's okay. And my sister who I told a few months ago after a few too many drinks and hoped she wouldn't remember the next day. And she must not have because she hasn't brought it up! Phew!

I didn't mean to tell my friend yesterday. We met for a lunch date and we were catching up on our jobs and I was whining about how I would rather be a full time crafter than a nurse (don't get me wrong, I LOVE my job... but I'm PASSIONATE about crafting/decorating/organizing/etc.). And she said something along the lines of, "you can do that. Lot's of people have those blogs...."

I half whispered across the table, "I have one."

Then the butterflies in my stomach started dancing around like crazy and I got all hot and panicky. WHY?!

She actually seemed excited and interested. So I told her about my fears... I'm not a good writer. I'm not a funny person. I don't know how to take good pictures. So what do I have to offer the blogging world other than my crazy craft-wired brain that sees DIY inspiration everywhere I go!?
She basically told me "so what!" You'll become a good writer. You can learn those things. She was very supportive. Which is why she is one of my best friends. Because she's the best!

I didn't tell her my blog's name, but I will one day I'm sure. Or she'll find it on her own. And then she'll see this post and know I'm crazy :)

But I came home after lunch and thought about it.. am I crazy? Is it weird to write your heart out to a bunch of strangers but be afraid to tell your friends and family that you blog?

Apparently not. I googled it. (Yup, you can google anything.) Tons of bloggers have posted about how much anxiety they get from friends finding their blog. People even use the term friends IRL (in real life). So I'm not alone. 

Read about it here (this post is my favorite. The commenters at the bottom make me feel so totally not alone in this), here, here, and here. Clearly I needed enough evidence from other bloggers to prove I'm not totally crazy ;)

The weird part is, the more I get into this whole blogging thing, the more I learn about how most bloggers are driven to gain followers. And I know if I would just post to Facebook or Pinterest, my traffic would increase overnight. But I'm just too afraid to share with people IRL (I can say that now!). I don't know what I'm afraid of exactly. It's just weird to tell people I have a blog. I don't even talk about anything super personal on my blog. But somehow, it makes me nervous!

And then I think about some of the blogs I've been reading for years. They were around before Facebook hit it big time and before Pinterest and Twitter even existed. They managed to gain followers and succeed without all the hype and promotion. Totally gives me so much respect for them now that I know how hard it is to start out in the blogosphere!

Then I stumbled across these two posts that gave me a little inspiration and encouragement. They reminded me that every blog starts somewhere. I can do this.

And so for now, I will continue to keep things on the down low. When I feel like my blog is ready to share (more content, better layout, more user friendly, better photography skills), I might think about telling my IRL friends :)

post signature

February Monthly Goals


In January I decided to start making some monthly goals of things to accomplish and share with you. It was my first month at this, so I'm going to cut myself a little slack. We weren't successful at completing everything on our list, but we did get a lot done! So here's our checklist.... (strike through is a completed task, bold is a task in progress!)
  • Paint the living room. Not done. Sadly. The paint is just sitting there waiting. It WILL be done this month for sure!
  • Finish decorating the foyer/entryway. Working on it! All that's left is finding a few frames for the wall, painting a mirror, and buying a rug!
  • Organize the basement. Not done. We've had some unusually cold weather this month and I just couldn't bring myself to bundle up for working in the basement. If it's warming in February, we'll tackle it then!
  • Post wedding pictures. Done! You can see them here!
  • Update aquarium stand. Work in progress. We started it in the garage. But again, FREEZING outside, so we put finishing it on hold. Come to think of it, the paint can sitting out there might possibly be frozen....
  • Organize the craft room. Done! You can see it here!
  • Create a home binder. Done!
  • Set up a budget. Done! Sort of... We got ourselves organized for it and are tracking our trends. 
What else did I spend my time in January doing? Well, I was mostly focused on making this blog more appealing and user friendly! I changed my header multiple times, added a font I like, changed the color of my background, added a signature, added buttons, added popular posts to my side bar, made some pages to keep things organized, the list goes on and on! Check out my Pinterest for some of the resources I used! I'm certainly not done working on it yet and there is TONS more to learn about blogging, but hopefully the changes I've made are for the best! Eventually I'll try to make a post organizing all of the tips and tricks I've learned from the resources on my Pinterest blogging board. 

Now for February... What shall we do this month?
  • Finish the foyer. Promise I will finish it this month!!!
  • Finish painting the living room and add some decor to the walls.
  • Finish updating the aquarium stand and start setting up the aquarium.
  • Work on organizing the basement if weather permits! Brrrr!!!
  • Decorate the guest bedroom and work on making it guest friendly.
  • Paint the stairway and upstairs hallway. This is ambitious. It might get pushed off to March, but we'll see!!
  • Continue learning how to use my new d-SLR.
  • Continue learning how to perfect my blog!
Happy February!

post signature

Organizing your craft spot

You may have seen me refer to our office as my "craft room" here and there. I've been dreaming of having a dedicated spot for crafting practically my whole life. I'm a crafter at heart. I see inspiration everywhere. I always want to craft. I could spend hours and hours in any craft store. The problem is that for the past almost 8 years all of my craft supplies have been in storage bins making it difficult to craft. I insisted on packing it all into bins to take to my dorm room in college (and from time to time did actually pull it all out to use!), then I lived in a small basement apartment and then a small townhouse. So there has never been room for all of my stuff! Storage bins make it difficult to keep organized, difficult to see what supplies I actually have, and difficult to motivate myself to dig out everything I need for a project. Ugh!

Organizing a Craft Room | Meet the B's

But now... now I finally have a room all to my own. I've just been shoving all of my bins and boxes of supplies in the room as we slowly unpack and organize the house, so it hasn't really been used as a craft room quite yet. I finally had time to do some organizing and can't wait to start using the space!


(That's my saltwater tank on the left! We're working on updating the stand for a bigger tank. Pictures soon!)

(And yes... that is a cat door on the cabinet. Gotta hide that poop box somewhere!!)

I started by unpacking all the bins and boxes and sorting everything into piles by category... pens, markers, photos, scrapbooking supplies, paper, paints, glue, sewing, crocheting, general crafts, etc. I didn't take any pictures of my massive piles of junk because it was a little beyond ridiculous. I surprised myself by being able to purge a lot of things. I tested all of my markers, paints, and glues and threw out any that were dried out. I threw pictures that I had duplicates of or were photos of someones eyeball or the floor or random blurred images. I threw out lots of pictures and words from magazines that I had clipped out in high school and college for collages I used to make (realistically I probably won't be making any of those anytime soon, so I figured I could part ways with scraps). 

After throwing out tons of terrible pictures, I sorted the ones I saved. I used to be a hard core scrapbooker, but I failed miserably at it during college since everything was packed away. Needless to say my photo collection got a little out of hand. I'll do further organizing later, but for now I divided pictures into piles based on elementary school, middle school, high school, college, and adult life. I made dividers for a photo box and put them all in one box. When I start scrapbooking again, I'll go by phases of my life until I get caught up. Elementary and middle school are pretty much done. It's the later years in my life that still need scrapbooked!

I bought a scrapbook organizer type thing from Hobby Lobby to organize all of my paper, stickers, letters, etc. Ah, it feels good to have paper organized. I also organized my large storage bins into a general crafts bin for all things that didn't have a specific category and a sewing bin for all of my fabric scraps, thread, yarn, needles, etc.


I bought photo boxes for a dollar at Hobby Lobby and used them for a few things. I need to buy one more for paints (do you love the Puma shoe box? This particular box held many random craft supplies since about the 10th grade!)


I decided to use some of our DIY wedding decorations in the craft room because a) they are my favorite colors and my craft room should definitely be my favorite colors!! and b) because I spent so much time on them and can't bring myself to tuck them away in a box somewhere. I love them!


I used one of the flower girl buckets to store all of my pens and permanent markers. I have a couple of bird cages around the room which I will show off when I have fully decorated the room. I hope to hang some frames and install some shelves sometime soon, so a few more wedding decorations will probably find their way in.


It feels SO good to finally have all of this stuff organized! Hopefully now I will be able to do more crafting!!

Stick around as I finish decorating this room too! Still need curtains, a rug, some wall frames, and shelves!
post signature